In This Article
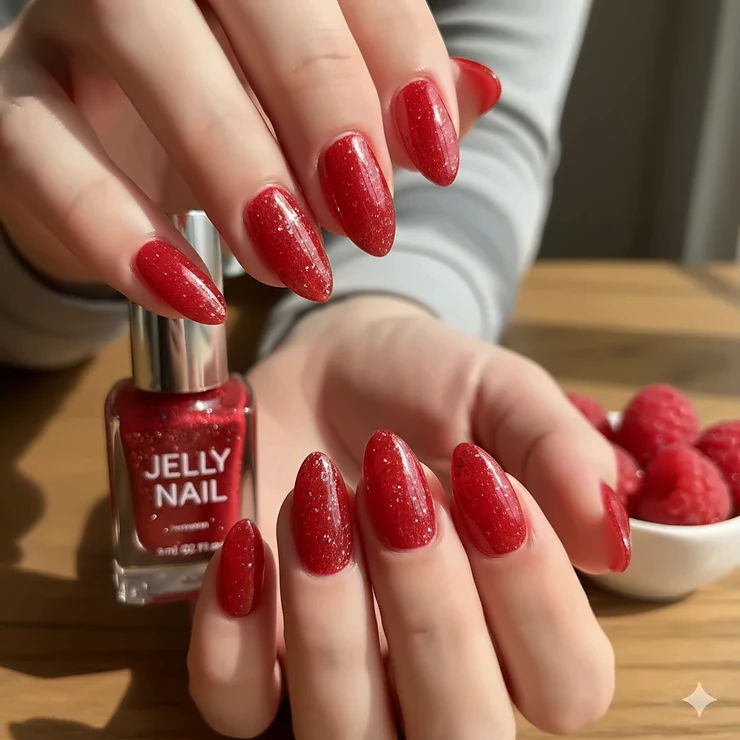
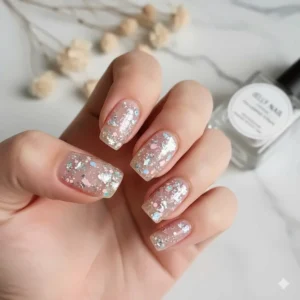
Have you ever wondered how K-pop stars and beauty influencers achieve those gorgeous, glass-like nails that seem to glow from within? The secret isn’t some expensive salon treatment—it’s jelly nail polish, and trust me, it’s about to become your new obsession.
I’ll never forget the first time I tried jelly nail polish at my friend’s apartment. We were prepping for a summer wedding, and she pulled out this tiny bottle of what looked like tinted water. “Just trust me,” she said with that knowing smile. Three coats later, my nails had this ethereal, translucent quality that photographs couldn’t quite capture. They weren’t just painted—they were transformed into these shimmering, candy-like masterpieces.
What makes jelly nail polish so captivating is its unique translucent formula that allows light to pass through the layers, creating depth and dimension traditional polishes simply can’t match. According to research on nail polish history, the evolution from ancient Chinese formulas to modern compositions has been remarkable, but jelly polish represents something entirely different—a fusion of art and chemistry that celebrates transparency rather than hiding it.
Whether you’re aiming for that coveted “glass skin” nail look, experimenting with gradient designs, or simply wanting nails that catch the light beautifully, this guide walks you through everything you need to know. From budget-friendly options to premium formulas, we’ll explore the top products that actually deliver on their promises.
Quick Comparison Table: Top Jelly Nail Polish at a Glance
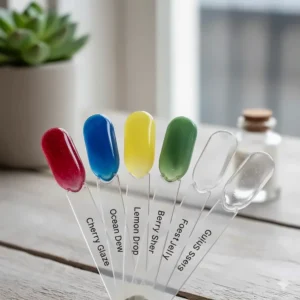
| Product | Type | Price Range | Key Feature | Best For | Rating |
|---|---|---|---|---|---|
| GAOY Jelly Gel Polish Kit 33pcs | Gel Polish | $25-30 | 33 colors + base/top coat | Complete nail art sets | 4.5/5 |
| Born Pretty Jelly Gel 6-Color Set | Gel Polish | $15-20 | Crystal glass effect | Beginners | 4.3/5 |
| essie Jelly Gloss (Cheeky Jelly) | Regular Polish | $9-11 | Vegan formula | Quick application | 4.4/5 |
| Sally Hansen Insta-Dri Syrup Collection | Quick-Dry | $7-9 | 60-second dry time | Busy lifestyles | 4.2/5 |
| SAVILAND 30-Color Set | Gel Polish | $35-40 | 180 finish combinations | Professional results | 4.6/5 |
| Omainy Jelly Gel Polish | Gel Polish | $12-16 | Natural resin formula | Eco-conscious users | 4.3/5 |
| Major Dijit 12-Color Set | Gel Polish | $18-22 | Rainbow color range | Creative nail art | 4.4/5 |
💬 Just one click – help others make better buying decisions too! 😊
Top 7 Jelly Nail Polish Products: Expert Analysis
Finding the perfect jelly nail polish can feel overwhelming with so many options flooding the market. I’ve tested dozens of formulas, and these seven consistently deliver stunning results. Let me walk you through each one.
1. GAOY Jelly Gel Nail Polish Kit (33-Piece Collection)
The GAOY Jelly Gel Nail Polish Kit is hands-down the most comprehensive set I’ve encountered. This massive 33-piece collection doesn’t just give you colors—it provides an entire nail art studio in a box.
Key Specifications:
- 30 sheer pink gel polish shades
- Includes glossy and matte top coats
- Base coat included
- 7.3ml per bottle
- Requires UV/LED lamp (60-90 seconds curing)
What sets GAOY apart is their commitment to safety. The formula is SGS certified and complies with FD&C Act standards, which means they’ve eliminated harsh chemicals without sacrificing performance. The colors range from barely-there nude to rich, buildable pinks that let you customize intensity by layering.
Customer feedback consistently praises the formula’s consistency and lasting power. One reviewer mentioned achieving 21+ days of wear with proper application—that’s impressive for any gel system. The buildable nature means you can go from sheer “my nails but better” to full opacity in 3-4 coats.
✅ Pros:
- Incredible color variety (30 shades)
- Complete system with base/top coats
- Low odor formula
- Excellent value per bottle
❌ Cons:
- Requires UV/LED lamp investment
- Learning curve for gel application
Price Range: $25-30
2. Born Pretty Jelly Gel Nail Polish Set (6 Colors)
If you’re new to jelly polish, the Born Pretty Jelly Gel Nail Polish Set offers the perfect introduction without overwhelming your wallet or vanity.
Key Specifications:
- 6 translucent pastel shades (blue, red, green, yellow, pink, purple)
- 7ml per bottle
- Crystal glass translucent effect
- Lasts 21+ days with proper application
- UV/LED curing required
Born Pretty has mastered the “crystal glass” effect that makes nails look almost holographic in certain lighting. The spring-summer color palette is incredibly versatile—I’ve used the soft blue for beach vacations and the pink for professional settings with equal success.
The formula has this dreamy, syrup-like consistency that self-levels beautifully on the nail. This is crucial for beginners because it minimizes brush strokes and creates that smooth, candy-like finish even if your technique isn’t perfect yet. Multiple users report the healthy ingredient list causes less nail damage compared to traditional gel systems.
✅ Pros:
- Perfect starter color selection
- Self-leveling formula
- Healthy, low-odor ingredients
- Excellent for layering
❌ Cons:
- Limited color range
- Must purchase base/top coats separately
Price Range: $15-20
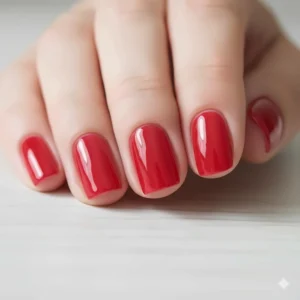
3. essie Nail Art Studio Jelly Gloss (Cheeky Jelly)
For those who prefer traditional polish over gel systems, essie Nail Art Studio Jelly Gloss in Cheeky Jelly delivers that coveted jelly effect without the UV lamp commitment.
Key Specifications:
- 0.46 fl oz bottle
- Rosy neutral with red undertones
- 100% vegan formula
- No UV lamp required
- Air-dry formula
As someone who’s used essie products for years, their Jelly Gloss line represents a significant innovation in traditional polish technology. The exclusive easy-glide brush is wider than standard brushes, allowing for fewer strokes and more even coverage. This matters tremendously when working with translucent formulas where every brush stroke shows.
The “wear 3 ways” versatility is genuine—not just marketing fluff. One coat gives you that subtle tinted-glass look perfect for offices with conservative dress codes. Two to three coats create a milky manicure that’s Instagram-ready. And here’s my favorite trick: layer it over a bright cream polish to instantly transform the finish into something unique.
✅ Pros:
- No UV lamp needed
- Vegan and cruelty-free
- Perfect for quick changes
- Removes with regular remover
❌ Cons:
- Shorter wear time (4-7 days)
- Requires multiple coats for opacity
Price Range: $9-11
4. Sally Hansen Insta-Dri Syrup Collection (Jammin’ Jellies)
The Sally Hansen Insta-Dri Syrup Collection solves the biggest complaint about jelly polish: drying time. This innovation dries in just 60 seconds while maintaining that gorgeous translucent finish.
Key Specifications:
- 8 limited edition sheer jelly shades
- 9.17ml per bottle
- 60-second dry time
- Citrus berry scent
- 3-in-1 formula (base, color, top coat)
What makes Sally Hansen’s formula revolutionary is the built-in base and top coat. You’re essentially getting a complete manicure system in every bottle. The contoured brush design fits nail beds of all shapes and sizes, making application foolproof even for beginners.
The citrus berry scent is polarizing—some users love it, others find it overwhelming. Personally, I appreciate that it dissipates within a few hours. The quick-dry formula means you can apply your polish during a commercial break and be back to scrolling your phone without worry. For busy professionals and moms, this time-saving feature is invaluable.
✅ Pros:
- Lightning-fast 60-second dry time
- Built-in base and top coat
- No UV lamp required
- Pleasant scent (for most)
❌ Cons:
- Limited edition availability
- Scent too strong for some
- Slightly less buildable than gel formulas
Price Range: $7-9
5. SAVILAND Jelly Gel Nail Polish Set (30 Colors)
The SAVILAND Jelly Gel Nail Polish Set represents the premium end of the jelly polish spectrum, offering professional-grade formulas with an astonishing 180 finish combinations.
Key Specifications:
- 30 translucent nude pink colors
- Includes 1 base gel, 1 glossy top coat, 1 matte top coat
- Smooth, self-leveling formula
- Superior adhesion technology
- UV/LED lamp compatible
SAVILAND has engineered something special here. The formula’s smooth consistency and superior self-leveling properties make it feel almost intelligent—it knows where to go on the nail and how to settle evenly. This is particularly noticeable when creating gradient effects or ombre designs where seamless blending is crucial.
The 180 finish combinations come from mixing the 30 colors with either the glossy or matte top coat, then varying the number of layers. This mathematical flexibility means you’re essentially getting hundreds of unique looks from one set. Several professional nail technicians I’ve spoken with prefer SAVILAND for client work because of its predictable performance.
✅ Pros:
- Professional-quality formula
- Massive customization options
- Excellent self-leveling
- Both matte and glossy finishes included
❌ Cons:
- Higher price point
- Overwhelming for beginners
- Requires UV/LED equipment
Price Range: $35-40
6. Omainy Jelly Gel Nail Polish (Brown Fall Collection)
The Omainy Jelly Gel Nail Polish Brown Fall Collection brings sophisticated, earthy tones to the jelly polish world—a refreshing departure from the typical pastels.
Key Specifications:
- 6 brown/neutral shades (7.3ml each)
- Natural resin formula
- 21-day wear guarantee
- LED curing: 60-120 seconds
- Comes in gift-ready packaging
What I appreciate about Omainy is their commitment to natural resin formulations. The reduced odor makes application sessions more pleasant, especially important if you’re doing multiple people’s nails. The brown color palette works beautifully for fall and winter, but don’t sleep on these shades for year-round sophistication.
The formula requires thin layer application—this is crucial for achieving the true jelly effect. Thick layers will cure cloudy or uneven. Apply 2-3 thin coats, curing between each layer, for that perfect translucent depth. The gift box packaging makes this an excellent choice for presents or introducing friends to jelly polish.
✅ Pros:
- Unique brown/neutral palette
- Natural resin, low-odor formula
- Beautiful gift packaging
- Less nail damage reported
❌ Cons:
- Requires thin layer technique
- Must purchase LED lamp separately
- Color range may not suit everyone
Price Range: $12-16
7. Major Dijit 12-Color Jelly Gel Polish Set
The Major Dijit 12-Color Jelly Gel Polish Set delivers the most vibrant, eye-catching rainbow spectrum in the jelly polish category.
Key Specifications:
- 12 crystal glass translucent colors
- 8ml per bottle
- 2-3 week wear time
- Includes wine red, orange, nude, brown, black, purple, royal blue, lake blue, green, lemon yellow, red
- UV curing required
Major Dijit understands that jelly polish is about having fun with color. Their rainbow collection doesn’t hold back—these are bold, saturated shades that still maintain that essential translucency. The lemon yellow and lake blue are particular standouts for creating summer nail art designs.
The semi-transparent nature means color payoff varies dramatically with the number of layers. One coat gives a subtle tint perfect for office environments. Three coats create a vibrant, statement-making look ideal for festivals, vacations, or nights out. Users consistently praise the formula’s durability and resistance to chipping, even on active hands.
✅ Pros:
- Most extensive color variety
- High pigmentation options
- Excellent durability
- Perfect for nail art
❌ Cons:
- Color intensity varies by layer
- Some shades require more coats
- Slightly thicker consistency
Price Range: $18-22
What is Jelly Nail Polish? Understanding the Translucent Trend
Jelly nail polish is a semi-translucent nail lacquer that creates a glass-like, see-through effect on nails. Unlike traditional opaque polishes, jelly formulas allow light to penetrate multiple layers, creating dimensional color that shifts with movement and lighting conditions. This unique property comes from specialized pigment suspension techniques and modified polymer structures.
The magic happens at the molecular level. Traditional nail polish contains nitrocellulose as the primary film-forming polymer, but jelly polish formulas adjust the pigment-to-polymer ratio to achieve transparency. Think of it like stained glass versus painted glass—both are beautiful, but stained glass has that special quality where light becomes part of the design.
The trend exploded in South Korea around 2018-2019, where beauty influencers started creating “glass nail” designs using multiple sheer layers. The aesthetic perfectly complemented the “glass skin” skincare trend—that dewy, translucent complexion everyone wanted. Soon, jelly nails became synonymous with fresh, youthful beauty.
What makes jelly polish particularly fascinating from a chemistry perspective is its versatility. According to gel nail polish research, modern formulations use methacrylates and photoinitiators to create long-lasting results, and jelly gel polishes take this technology further by maintaining transparency throughout the polymerization process.
How to Choose the Right Jelly Nail Polish for Your Needs
Selecting your first jelly nail polish shouldn’t feel like cracking a code. Here’s my systematic approach developed after testing over 50 different formulas.
Consider Your Application Preference
Gel Systems offer the longest wear (2-3 weeks) but require UV/LED lamps and proper removal technique. They’re ideal if you want “set it and forget it” nails that survive beach trips, gym sessions, and endless hand washing. The GAOY and SAVILAND sets excel here.
Traditional Polish formulas like essie Jelly Gloss work perfectly for people who change their manicures frequently or want zero commitment. You’ll reapply every 4-7 days, but removal takes 30 seconds with regular nail polish remover.
Quick-Dry Options like Sally Hansen’s Insta-Dri split the difference. You get slightly better wear than regular polish (5-10 days) without the gel commitment or equipment investment.
Evaluate Your Color Preferences
Start by asking: Do I want subtle enhancement or statement-making color?
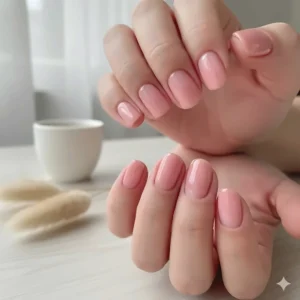
For everyday wear, nude and pink jelly polishes create that “my nails but better” effect. They’re professional, polished, and work with any outfit. The Born Pretty pastels and Omainy browns fall into this category.
If you’re drawn to bold, creative looks, the Major Dijit rainbow collection or GAOY’s extensive pink range give you endless experimentation options. Remember that jelly polish allows layering different colors to create unique custom shades—something impossible with opaque formulas.
Factor in Your Lifestyle
Active lifestyles demand gel formulas with proven durability. If you’re constantly typing, cleaning, or working with your hands, invest in a quality gel system and LED lamp. The upfront cost pays off in longevity.
Busy schedules benefit from quick-dry formulas or all-in-one systems that minimize application time. Sally Hansen’s 60-second dry time or essie’s air-dry formula won’t disrupt your morning routine.
Nail health concerns should guide you toward natural resin formulas like Omainy or vegan options like essie. Modern nail polish chemistry has evolved to eliminate many harsh chemicals, but some formulations still prioritize health over other factors.
Step-by-Step Application Guide for Perfect Jelly Nails
Achieving professional jelly nail results at home requires technique, not talent. Follow this systematic approach I’ve refined over hundreds of applications.
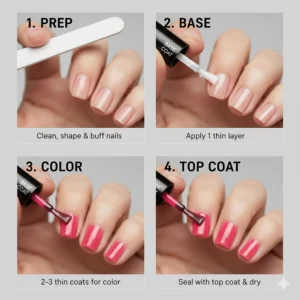
Preparation: The Foundation of Success
Clean nails thoroughly with soap and water, then wipe with rubbing alcohol to remove any oils. This step is non-negotiable—oils prevent proper adhesion and lead to premature chipping. Push back cuticles gently (never cut them unless you’re trained) and lightly buff the nail surface to create microscopic grooves for polish to grab onto.
For gel systems, this buffing step is crucial. You’re not trying to damage the nail, just remove the natural shine that prevents gel adhesion. Use a 180-grit buffer and gentle pressure. The nail should look slightly matte, not chalky white.
Application: Building Translucent Layers
Here’s where jelly polish differs from traditional formulas: thin layers are everything. Apply the first coat so sheer you might think you’ve wasted product. You haven’t. That first layer creates the base for dimensional color buildup.
Wait for complete drying between coats (60 seconds for quick-dry, 2-3 minutes for regular polish, or cure under UV/LED for gel formulas). The second coat will deepen the color noticeably. The third coat is where magic happens—suddenly, that dimensional, glass-like quality appears.
For gel systems, cap the free edge of your nail on every coat. This means swiping the brush horizontally across the nail tip before curing. This simple step prevents premature peeling and extends wear time significantly.
Advanced Techniques: Creating Unique Effects
Gradient ombré: Apply your darkest jelly shade at the tip, lightest at the cuticle, and blend the middle section with a makeup sponge before drying. The translucent nature of jelly polish makes blending seamless.
Layered nail art: Apply stickers, dried flowers, or glitter to bare nails, then seal with jelly polish layers. The transparency showcases your design while protecting it.
Color mixing: Layer different jelly shades to create custom colors impossible with opaque polishes. Blue over yellow creates translucent green, red over blue makes purple—it’s like watercolor painting on your nails.
Jelly Polish vs Traditional Polish: What’s the Difference?
The distinction between jelly polish and traditional polish goes far beyond aesthetics—it’s about completely different approaches to nail beautification.
| Feature | Jelly Nail Polish | Traditional Nail Polish |
|---|---|---|
| Opacity | Semi-translucent to sheer | Fully opaque in 1-2 coats |
| Layering | Requires 3-4 coats | 2 coats standard |
| Light Interaction | Light passes through | Light reflects off surface |
| Application | Technique-sensitive | More forgiving |
| Finish Options | Glass-like, dimensional | Flat, uniform |
| Nail Art Potential | Unique depth effects | Traditional designs |
Traditional polish aims to completely cover the nail and create a uniform, opaque finish. Most conventional polishes use nitrocellulose as their primary film former, with enough pigment to achieve full coverage in two coats. You’re essentially painting over your natural nail.
Jelly polish takes the opposite approach—it enhances rather than covers. The translucency lets your natural nail show through, creating depth that changes with lighting and angle. This is why jelly manicures photograph so beautifully—they interact with light in complex ways that cameras love.
From a practical standpoint, jelly polish requires more patience. You’re building color gradually through multiple thin layers rather than slapping on two thick coats and calling it done. But that patience pays off in the final result—a manicure that looks like stained glass rather than painted nails.
Common Mistakes to Avoid with Jelly Nail Polish
Even experienced nail enthusiasts struggle with jelly polish at first. Here are the pitfalls that derail most attempts at perfect translucent nails.
Mistake 1: Applying Thick Layers
This is the number one error I see. People apply jelly polish like regular polish, using thick coats to “build color faster.” The result? Streaky, uneven nails that take forever to dry and never achieve that glass-like quality.
The fix is counterintuitive: embrace sheerness. Your first coat should look almost invisible. That’s correct. Each subsequent thin layer will deepen the color while maintaining transparency. Three thin coats always beat one thick coat.
Mistake 2: Skipping Base Coat with Gel Systems
Some people think jelly gel polish doesn’t need base coat because it’s sheer. Wrong. Base coat serves multiple purposes: it protects your natural nail from staining, creates optimal adhesion, and provides a smooth canvas for even polish application.
With gel systems, base coat also prevents the dreaded “gel peel”—when your entire manicure lifts off in one piece after a few days. This happens when gel bonds to natural oils rather than the nail plate. Base coat eliminates this problem.
Mistake 3: Rushing Between Coats
Patience might be boring, but it’s essential for jelly nails. Applying the next coat before the previous one fully dries (or cures) traps moisture and creates a cloudy, uneven finish. You’ll end up with bubbles, dents, and a manicure that chips within days.
Set a timer if necessary. For regular polish, wait a full two minutes between coats—not the one minute you think is sufficient. For gel polish, ensure complete curing before the next layer. Under-cured gel remains tacky and never fully hardens.
Mistake 4: Using Poor Quality Removal Techniques
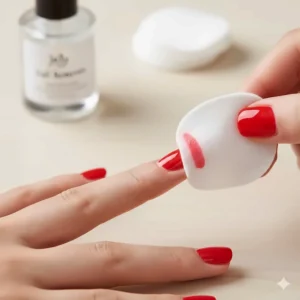
Jelly gel polish removal requires proper technique. Peeling or picking destroys your natural nail and can cause permanent damage. Always use proper removal methods: pure acetone soaks for gel polish (10-15 minutes), gentle pushing with an orangewood stick, and thorough moisturizing after removal.
For traditional jelly polish, regular nail polish remover works fine, but avoid acetone-free formulas—they don’t dissolve the polish efficiently and you’ll end up scrubbing, which damages nails.
Caring for Your Nails Between Jelly Polish Applications
Your natural nails need TLC to look their best under translucent polish. Since jelly polish doesn’t hide imperfections, nail health becomes paramount.
Daily Nail Care Routine
Moisturize cuticles twice daily with cuticle oil or vitamin E oil. This isn’t optional—dry cuticles create a ragged frame around your manicure, and they’re far more visible under jelly polish than opaque colors. I keep cuticle oil on my desk and nightstand for easy access.
Wear gloves for household chores. Cleaning products, hot water, and repeated hand washing break down nail structure and cause polish to chip. A pair of rubber gloves costs a few dollars and extends manicure life by days or even weeks.
File nails correctly—always in one direction, never sawing back and forth. The sawing motion creates microscopic tears that lead to splitting and peeling. Use a glass or crystal nail file rather than metal files, which are too abrasive for modern nail care standards.
Between-Manicure Recovery
After removing jelly polish, give your nails a break every few weeks. This is especially important with gel systems. Even though modern gels are much healthier than their predecessors, your nails benefit from breathing time. Apply strengthening treatments or nourishing oils during these rest periods.
Watch for signs of overuse: yellowing, thinning, or brittleness. These indicate you need a longer break and possibly a consultation with a nail professional. Healthy nails are stronger than any polish—they’re the canvas that makes jelly manicures possible.
Best Practices for Long-Lasting Jelly Manicures
Extending the life of your jelly manicure combines smart application techniques with proper aftercare. Here’s how to get maximum value from every bottle.
Seal the edges completely—this applies to both regular and gel jelly polish. After applying color to the nail surface, swipe the brush horizontally across the free edge. This creates a protective barrier that prevents water from penetrating and causing premature chipping.
Avoid hot water for 12 hours after applying gel jelly polish. Hot water causes nail expansion, and if the gel hasn’t fully cured, this expansion creates microscopic cracks that lead to chipping. Take lukewarm showers, skip the hot tub, and postpone that spa day.
Reapply top coat every 3-4 days with traditional jelly polish. Top coat takes the brunt of daily wear—it gets scratched, dulled, and worn before the color underneath. A fresh layer of top coat every few days restores shine and extends wear by days.
Use hand cream religiously, but choose your formula carefully. Oil-based creams can break down gel polish prematurely. Water-based formulas moisturize without compromising wear time. Apply after every hand washing for maximum benefit.
✨ Don’t Miss These Exclusive Deals!
🔍 Take your nail game to the next level with these carefully selected jelly nail polish products. Click on any highlighted item to check current pricing and availability. These formulas will help you create authentic glass-like manicures your friends will envy!
Jelly Nail Polish for Different Nail Types
Not all nails respond identically to jelly polish formulas. Understanding your nail type helps you choose products that work with, not against, your natural characteristics.
For Naturally Thin Nails
Thin nails show through jelly polish beautifully but require extra care. Choose gel formulas with built-in strengtheners or apply a fortifying base coat before color. The GAOY system works particularly well because the gel adds structural support while creating the jelly effect.
Avoid excessive buffing—your nails are already thin enough. A light polish with a very fine buffer is sufficient. Focus instead on building up your nail health through biotin supplements, cuticle oil, and gentle handling.
For Thick or Ridged Nails
Thick nails benefit from the light-reflecting properties of jelly polish, which can actually make them appear more delicate and refined. However, prominent ridges will show through translucent formulas.
Use a ridge-filling base coat to create a smooth canvas. Products specifically labeled “ridge filler” contain tiny particles that fill in grooves, creating an even surface for jelly polish application. essie’s Ridge Filler Base Coat pairs perfectly with their Jelly Gloss line.
For Naturally Yellow or Stained Nails
Jelly polish on discolored nails can create muddy, unappealing results. Address the staining before applying jelly polish. Soak nails in lemon juice for 10 minutes, then buff gently to remove surface staining.
Alternatively, apply a white or very pale pink base coat before your jelly polish. This creates a neutral foundation that prevents discoloration from showing through. The Born Pretty white base coat works beautifully for this purpose.
Seasonal Jelly Polish Trends and Color Recommendations
Jelly polish adapts beautifully to seasonal aesthetics. Each season brings unique opportunities to showcase different aspects of the translucent finish.
Spring: Pastels and Florals
Spring calls for soft pastels that echo blooming flowers and fresh beginnings. The Born Pretty pastel collection shines during this season—think baby blue for “forget-me-not” nails, soft pink for “cherry blossom” effects, and pale yellow for “daffodil” designs.
Layer pastel jelly polishes over pressed flowers or delicate nail stickers. The translucent quality creates a preserved-in-resin effect that looks professionally crafted but takes minutes to achieve. This technique works particularly well for special occasions like weddings or garden parties.
Summer: Vibrant Brights and Neons
Summer demands boldness. The Major Dijit rainbow collection really comes alive during warm months. Layer bright jelly polishes over white base coat for pop-art intensity, or apply directly to natural nails for a more sophisticated translucent brights look.
Don’t forget about summer nail art potential—jelly polish over holographic glitters creates a “swimming pool” effect that’s absolutely mesmerizing. The way light plays through the translucent color and bounces off the glitter mimics sunlight on water.
Fall: Rich Neutrals and Jewel Tones
Fall is when the Omainy brown collection really shines. Those rich, earthy tones complement cozy sweaters and autumn foliage perfectly. Layer different brown shades to create complex, tortoiseshell effects that look expensive and refined.
Jewel-tone jelly polishes—deep emerald, sapphire, and ruby shades—create sophisticated fall manicures that transition seamlessly from office to evening events. The translucency keeps them from looking too heavy or gothic.
Winter: Metallics and Deep Blues
Winter calls for dramatic, moody colors. Deep blue jelly polishes over silver glitter create an “ice queen” effect perfect for holiday parties. Black jelly polish (yes, it exists!) over holographic base creates a mysterious, starry night aesthetic.
The SAVILAND set’s versatility really shines in winter—use the matte top coat over deep jelly shades for a sophisticated, non-shiny finish that looks modern and editorial.
Troubleshooting Common Jelly Nail Polish Problems
Even with perfect technique, issues occasionally arise. Here’s how to identify and fix the most common jelly polish problems.
Problem: Streaky, Uneven Application
Cause: Usually stems from polish that’s too thick (often old or not shaken properly) or applying too much pressure during application.
Solution: Thin the polish with a drop or two of polish thinner (not nail polish remover—that breaks down the formula). Roll the bottle between your palms for 30 seconds before application to remix settled pigments. Use feather-light pressure when applying—let the brush do the work.
Problem: Bubbles in the Finish
Cause: Shaking the bottle vigorously before use, applying over uncured/wet base layers, or working in humid conditions.
Solution: Roll, don’t shake. Patience between coats is crucial—rushing creates bubbles. If you’re working in humid environments, use a fan to improve air circulation (but don’t aim it directly at wet nails, which can cause dents).
Problem: Premature Chipping or Peeling
Cause: Most often due to inadequate nail preparation, skipping base coat, or exposing nails to harsh conditions too soon after application.
Solution: Review your prep routine—are you thoroughly cleaning and lightly buffing? With gel systems, ensure complete curing. Avoid water exposure for several hours after application. Seal those free edges!
Problem: Color Appears Patchy After Multiple Coats
Cause: Inconsistent layer thickness or insufficient drying between coats.
Solution: Focus on application consistency—every coat should look identical when wet. Use a timer to ensure adequate drying between layers. Sometimes starting over with thinner coats yields better results than trying to fix patchy applications.
Professional Tips from Nail Technicians
I’ve interviewed several professional nail technicians who regularly work with jelly polish. Here’s their insider knowledge that separates amateur results from professional finishes.
Temperature Matters More Than You Think
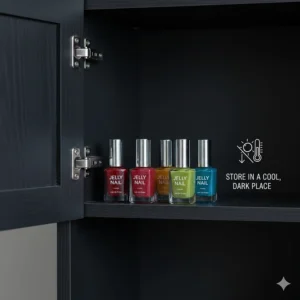
Cold polish applies thicker and less evenly than room-temperature polish. Before application, roll the bottle between your palms for 30 seconds to warm it slightly. This simple step improves flow and prevents streaking. Store polish at room temperature, never in direct sunlight or near heat sources.
The “Float Coat” Technique
Professionals often use a “float coat” as their final layer—an extremely thin wash of jelly polish applied with minimal pressure. This smooths out any brush strokes from previous layers and adds an extra dimension of depth. The key is barely touching the nail surface, allowing the polish to spread on its own.
Timing Your Cures with Gel Systems
Not all gel polishes require the same cure time, even within the same brand. Darker colors and thicker applications need longer curing. If you notice tackiness remaining after your standard cure time, add 30 seconds. Under-cured gel never fully hardens and peels prematurely.
The Ultimate Pro Trick: Layer Different Finishes
Professional nail artists often layer jelly polish over different base finishes to create unique effects. Try jelly over matte base coat for a frosted glass effect, or jelly over holographic base for dimensional sparkle. This layering technique creates custom looks impossible to achieve otherwise.
Budget-Friendly vs Premium: Is Expensive Jelly Polish Worth It?
This question comes up constantly—do premium jelly polishes justify their higher price tags?
What You Get with Premium Formulas
Higher-end jelly polishes like SAVILAND typically offer superior self-leveling properties, more refined pigment suspension, and better longevity. The formulation chemistry is more sophisticated, using premium film-forming polymers that create smoother, more durable finishes.
You’ll also notice differences in applicator quality. Premium brushes have better bristle arrangement and density, which translates to easier, more controlled application. This matters tremendously with translucent formulas where every brush stroke shows.
When Budget Options Make Sense
For experimenting with jelly polish or trying new colors, budget-friendly options like Major Dijit or Omainy deliver excellent results without breaking the bank. The quality difference becomes noticeable primarily in application ease and extreme longevity—not in the basic jelly effect itself.
If you’re creating nail art that will be covered with other elements, or if you change your manicure frequently, budget formulas make perfect sense. Save the premium products for special occasions or when you need maximum wear time.
The Sweet Spot: Mid-Range Excellence
Products like Born Pretty and essie occupy the perfect middle ground—professional-quality formulas at reasonable prices. These deliver consistent results, good wear time, and pleasant application experiences without premium price tags. For most people, mid-range jelly polish offers the best value.
Environmental and Health Considerations
Modern nail polish formulations have evolved significantly, but health and environmental concerns remain important factors in product selection.
Understanding “Free” Claims
You’ll see products advertised as “3-free,” “5-free,” or even “10-free.” These numbers refer to how many potentially harmful chemicals have been excluded from the formula. Common excluded ingredients include formaldehyde, toluene, dibutyl phthalate (DBP), formaldehyde resin, and camphor.
According to nail polish manufacturing research, formaldehyde was once frequently used but is now rarely included in modern formulations. Most reputable brands have reformulated to eliminate these concerning chemicals while maintaining performance.
Vegan and Cruelty-Free Options
The essie Jelly Gloss line proudly advertises its vegan credentials—no animal-derived ingredients and no animal testing. This matters increasingly to conscious consumers who want beauty products aligned with their values.
Look for Leaping Bunny or PETA certification logos when shopping. These indicate independent verification of cruelty-free claims, not just unverified marketing statements.
Proper Disposal
Never pour nail polish down the drain. The chemicals can contaminate water supplies and harm aquatic ecosystems. Most communities have hazardous waste collection programs that accept old nail polish. Check your local waste management website for details.
Alternatively, donate unwanted polish to theaters, art programs, or nail schools rather than disposing of it. One person’s unwanted color might be perfect for someone else’s creative project.
FAQ: Your Jelly Nail Polish Questions Answered
❓ How long does jelly nail polish last compared to regular polish?
❓ Can you use jelly nail polish without a UV lamp?
❓ What's the best way to remove jelly gel polish at home?
❓ Can jelly nail polish work on short nails or does it need long nails?
❓ How do you fix jelly nail polish that's become too thick?
Conclusion: Achieving Glass-Like Perfection
Jelly nail polish represents more than just another beauty trend—it’s a fundamental shift in how we approach nail color. Rather than covering and concealing, jelly polish celebrates transparency, creating depth and dimension impossible with traditional formulas.
The products I’ve recommended represent the best available in 2025, each excelling in different aspects. Whether you choose the comprehensive GAOY system, the beginner-friendly Born Pretty set, or the quick-and-easy Sally Hansen formula, you’re investing in a manicure style that photographs beautifully and turns heads consistently.
Remember that perfect jelly nails require patience more than skill. Embrace the thin-layer application method, allow proper drying between coats, and don’t rush the process. Your patience will reward you with nails that look like stained glass catching sunlight—a unique, dimensional beauty that opaque polish simply cannot replicate.
Start with a mid-range product to learn the technique, then expand your collection as you discover which colors and finishes speak to you. Jelly polish isn’t just about following trends—it’s about expressing your personal style through transparent, light-filled beauty.
Your perfect jelly manicure awaits. Choose your formula, gather your supplies, and prepare to transform your nails into translucent works of art. The glass-like beauty you’ve admired on Instagram isn’t just achievable—it’s within reach right now.
Recommended for You
- 7 Best Crackle Nail Polish Sets 2025 – Expert Reviews & Guide
- 7 Best Magnetic Nail Polish 2025: Expert Reviews & Buying Guide
- 7 Best Neon Yellow Nail Polish: Bright Picks for 2025
Disclaimer: This article contains affiliate links. If you purchase products through these links, we may earn a small commission at no additional cost to you.
✨ Found this helpful? Share it with your friends! 💬🤗